
Welcome Back! In the last installment we tweaked our training to get the model a little more accurate and then exported the model to a .pkl file. Now we will create a prototype frontend using gradio. So, let’s get started! git checkout step8
Step 8
There are a few new things to see here, there is a new function, a new file and a new folder. Let’s start with the new function in the main.py file:
def predict_image(model_path, image):
    image = PILImage.create(image).to_thumb(224, 224)
    model = load_learner(model_path)
    pred, pred_idx, probs = model.predict(image)
    return f'{probs[pred_idx]*100:.02f}% sure this is a {pred}'
This function is pretty straight forward it takes a model file and an image and then predicts what that image will be based on the model supplied. Because we want to pick from a dropdown of models in gradio we will also move our model file to the models folder, now onto setting up gradio.
Gradio
Gradio is a convenient library for building demo applications, it’s largely used for deep/machine learning applications, but could really be used with any application that takes some input and generates some output. I’ve added the import for gradio in the requirements.txt file, so on the command line execute: pip install -r requirements.txt
The nice thing about gradio is how easy it is to create a simple UI that you can use to test out your model, rather than needing to get into the weeds of which front end library you will use and how it will be designed, etc. Lets check out app.py:
import gradio as gr
import main
import os

model_list = ['models/' + model for model in os.listdir('models')]

demo = gr.Interface(
    title="Chanterelle or Not",
    fn=main.predict_image,
    inputs=[gr.Dropdown(model_list), "image"],
    outputs=["text"],
)

demo.launch()
That is all the code you need to have an operational application you can test on the fly! We are importing main so that we have access to our predict function, and we call gr.Interface, gradio’s main high level class, to build a simple UI. It takes 3 parameters, a function to call, the input types of that function (in the correct order), and the output types of the function. The function will be the predict_image funtion. I want the input for the model to be a selection of the models that are in the models folder, so I use the Dropdown type and give it list of the files in the models folder, and as the second input type I specify that it will be an image, for outputs we are looking for the text that tells us the prediction for our image.
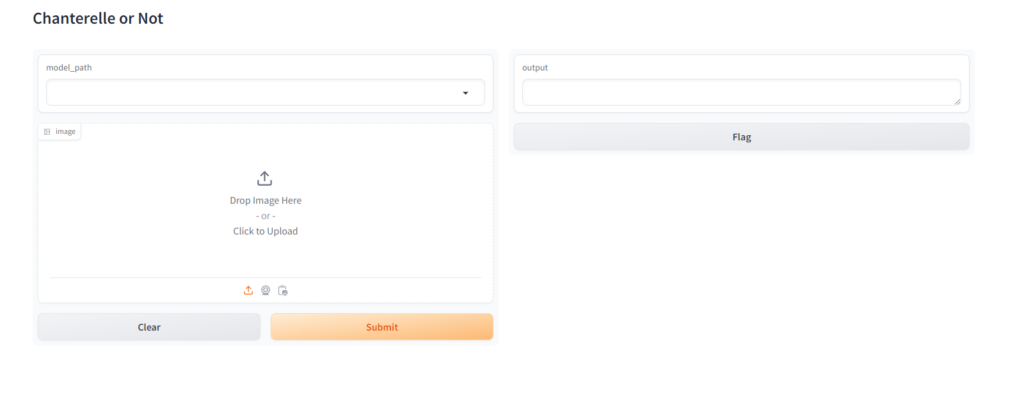
Finally we call launch on the interface and lets see what we get. python app.py

You should see this in your console, so let’s navigate to the linked url:
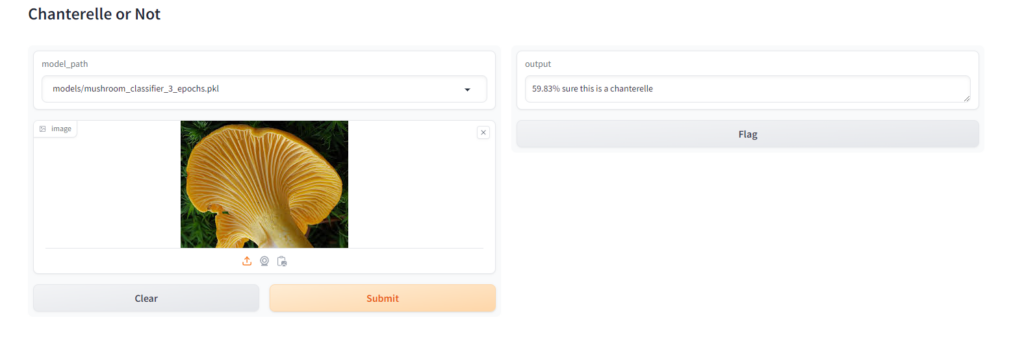
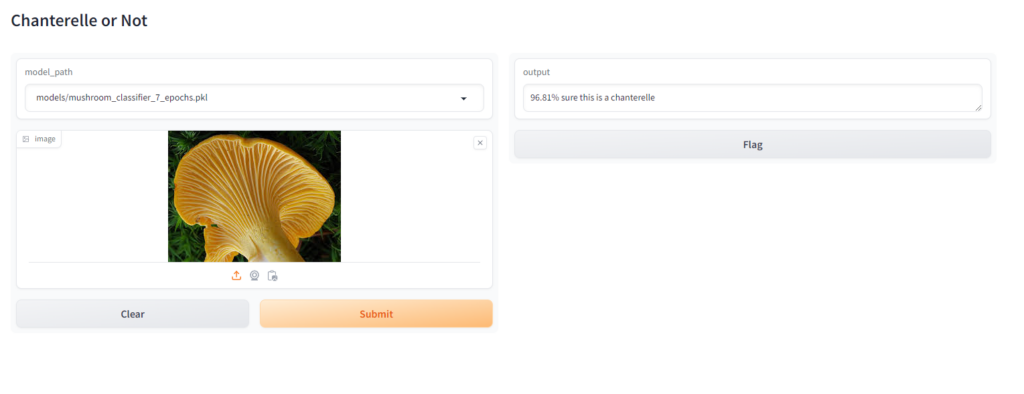
You can see that we have our two inputs, a model selector and an image box, so lets grab an image of a chanterelle and a jack o’ lantern and see what our results are, just to show the difference the number of epochs made on the quality of our model I’ll show a comparison of the 3 epoch, 5 epoch and 7 epoch versions:
Chanterelle

Jack O’ Lantern
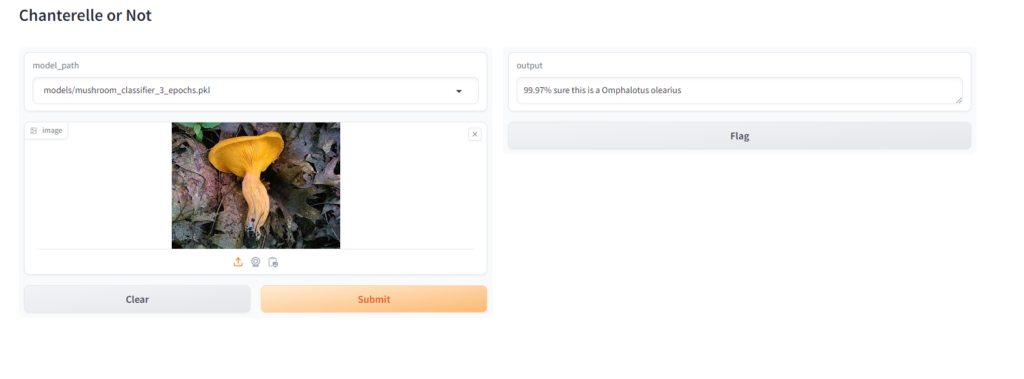

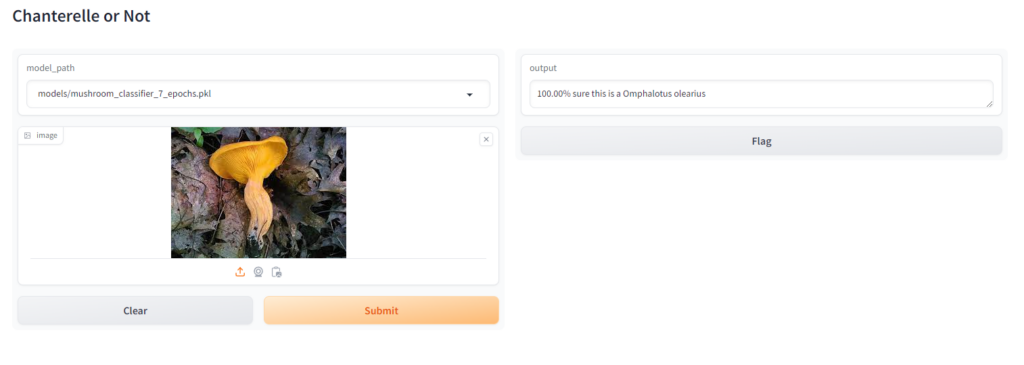
When Testing this I made sure that, at least in the case of the jack o’ lantern, I found an image that wasn’t in the training set or validation set to see how it would perform. For the chanterelle, which had many more images to build from you can see that increasing the epochs made a big difference in the confidence of the model, especially between 3 and 5 epochs, for the jack o’ lantern it didn’t make much of a difference because there were just not enough images.
One more great thing about gradio you can make your application publicly accessible without needing to go through the trouble of spinning up your own server, and it can all be done with one line of code. When you ran gradio the last message tells you how:

So let’s add share=True as a parameter inside the launch function call in app.py, and then run it again: demo.launch(share=True)

As you can see the public url is now listed under the local url, as you can see as is states below the link will expire in 72 hours. Unless you gradio deploy to deploy to hugging face spaces, which we will do in a bit.
Step 9
Now that we have our demo front end, I’d like to make this model a little more useful, I like more than just chanterelles and it would probably be a good idea to add a few of the very poisonous mushrooms so that when using this dangerous ones will be identified: git checkout step9.
Since we are adding these by their scientific names I’ve added a function to rename the folders to their common names for ease of use. I’ve also added all of the new mushrooms, and fore some reason a few php files showed up with the images so I refactored the remove png files function to be more general and allow removal of any supplied type:
def main():
    mushroom_types = ('Laetiporus', 'Bolete', 'Amanita muscaria', 'Amanita virosa', 'Amanita bisporigera'
                      , 'Amanita ocreata', 'Pleurotus ostreatus', 'Morchella', 'Agaricus bisporus', 'Amanita phalloides'
                      , 'Conocybe filaris', 'Galerina marginata', 'Lepiota brunneoincarnata')
    get_images('images/', mushroom_types)

    # remove png for all mushroom types and also remove duplicates
    for mushroom_type in mushroom_types:
        remove_file_types(f'images/{mushroom_type}', '.png')
        remove_file_types(f'images/{mushroom_type}', '.php')
        remove_image_duplicates(f'images/{mushroom_type}')

    rename_mushroom_folders()

    model = train_model('images')
    examine_model(model)
    model.export(f'models/mushroom_classifier_v2.pkl')
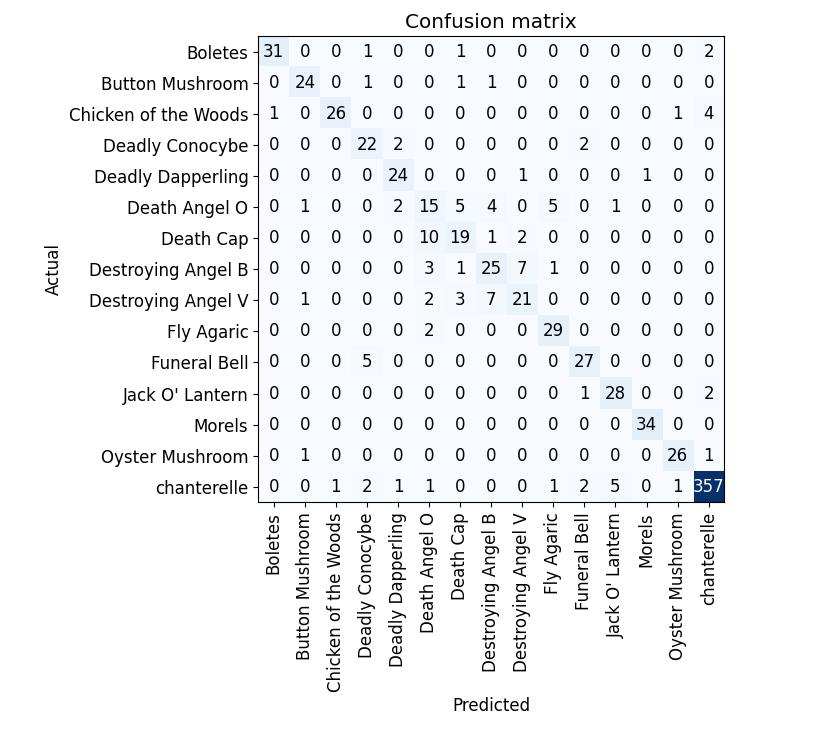
Let’s run the updated code: python main.py
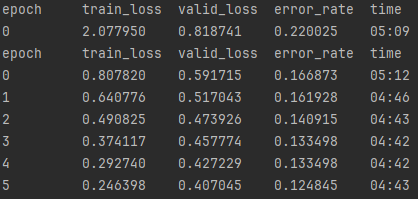
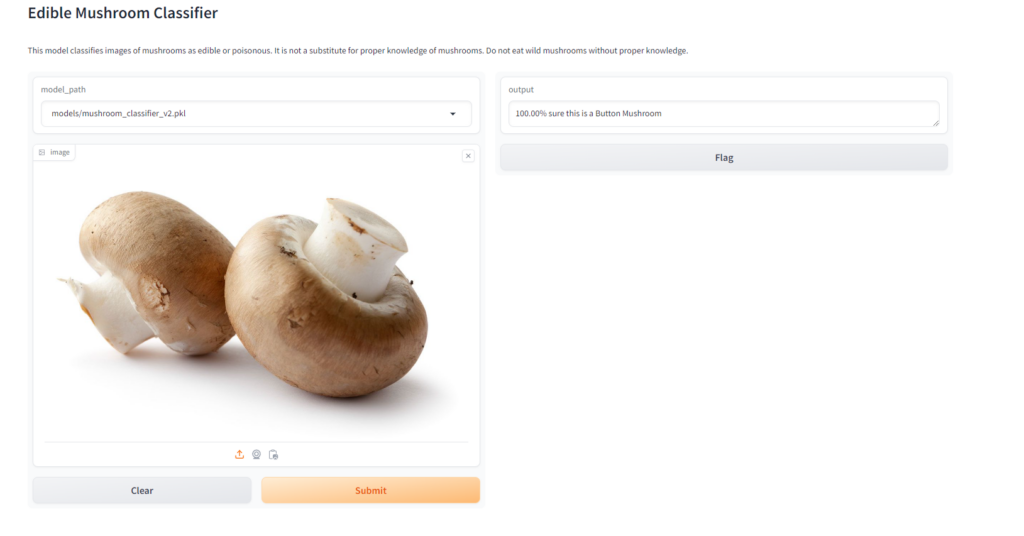
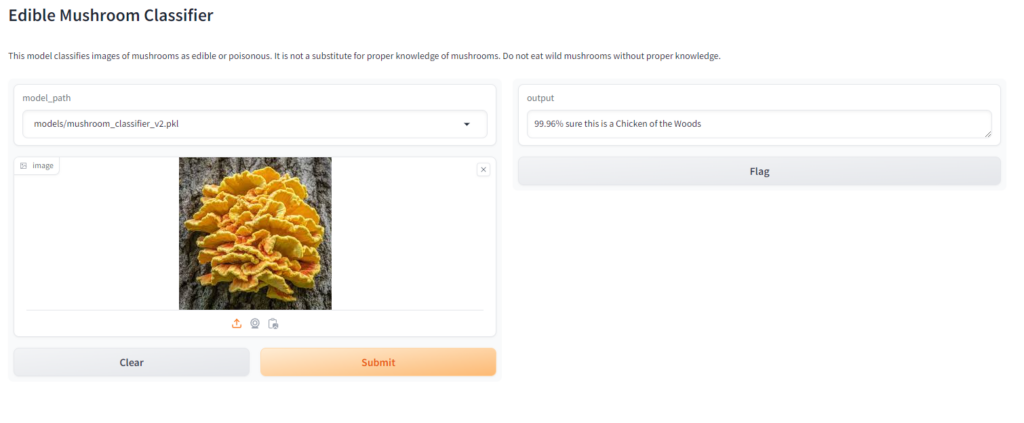
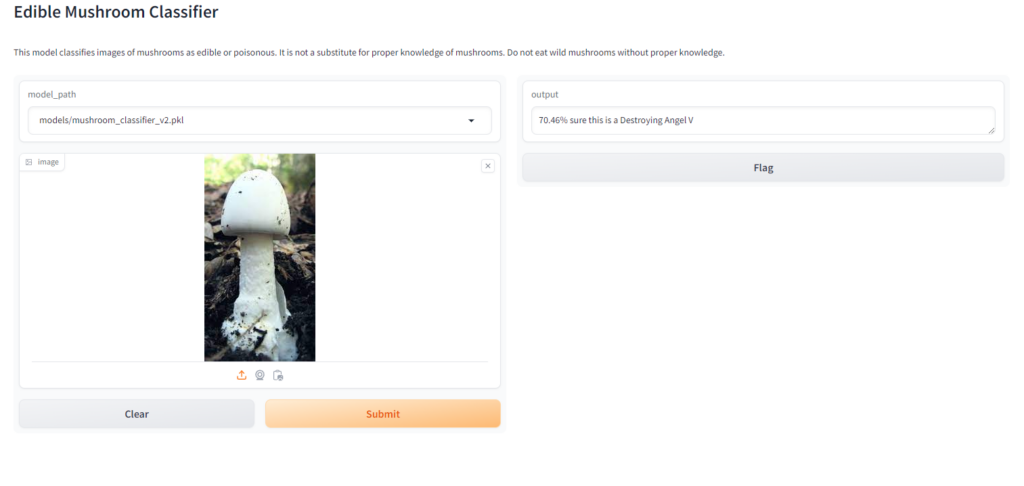
The error rate is about 12% now which is actually OK, the rate has increased because there are now so many more mushrooms to compare, but if you check out the confusion matrix below you will see that the individual error rate for each mushroom individually is still around 10% for every mushroom that was added with the Bing Search API and around 3% for the Chanterelle, whose images we retrieved from a curated dataset of thousands of images. The only exception is around the destroying angel varieties, which are easily confused with one another but overall that doesn’t really matter since in this specific case we just want to know if its a destroying angel of any type.
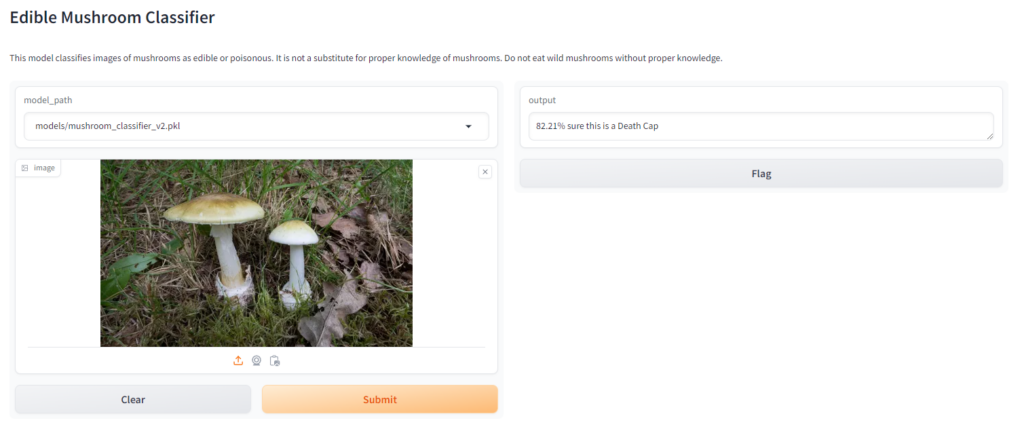
There are also a few changes to the app.py file, I’ve added a disclaimer, as well as well as changed the title so that it reflects the more general model we are running now. Let’s run our demo front end again just to check how everything looks: python app.py
The results are pretty good!
Now, let’s finish up by deploying our demo to huggingface spaces! git checkout step10
Step 10
To prepare for deploying to huggingface, there are a few changes that need to be made to reduce the amount of files we will need to upload, firstly I’ve moved the predict_image function from main.py to app.py, since that is the only funciton needed by the deo, and all of the other functions in main really only deal with training. I’ve also added the following lines to the top of the app.py file:
plat = platform.system()
if plat == 'Linux': pathlib.WindowsPath = pathlib.PosixPath
This code is necessary if you created your model on windows, as hugging face runs the app on linux you will get path errors without these lines. Finally, in the requirement.txt file, I’ve added the specific version because there are some imports that won’t work otherwise when huggingface builds the application. Now on to the deployment!
Navigate to https://huggingface.co/ and sign up, after you sign up you will need to verify your email address.
After you are all set up navigate to https://huggingface.co/spaces, on the screen you should see a “Create new Space” button, click that and you will get a github like repo creation screen:
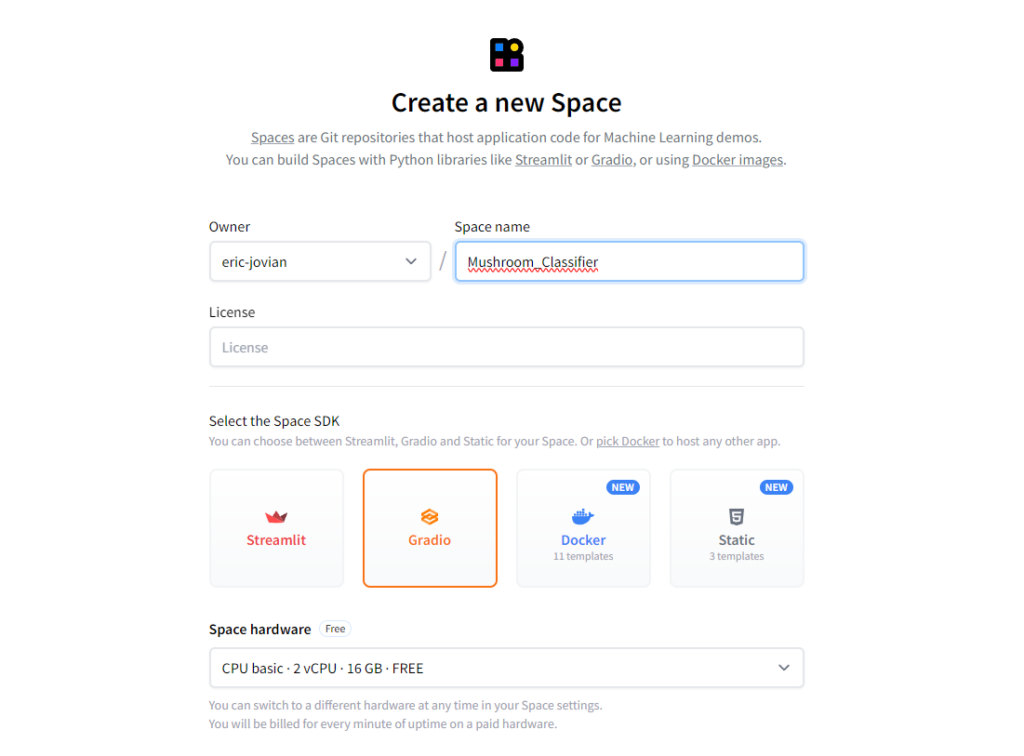
Name your repo select the Gradio option for your SDK and make sure you are on the free version of the space hardware, then click the create space button at the bottom of the page.
The next page you will see is the page giving information on how to clone your repo and post changes with git, but since the ignored files in the actual repo will be different than for this space and I don’t actually need the main.py file, I will suggest manually uploading the files by clicking the files tab at the top of the screen
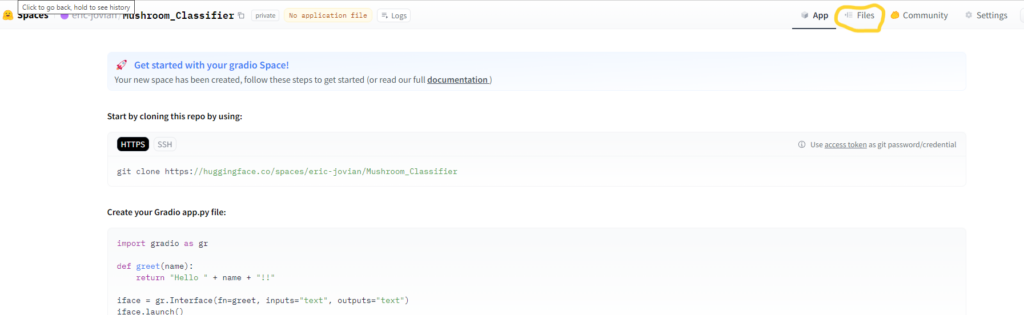
Before we go ahead and add the files there is one change that should be made to the app.py file, in the predict_image function, change the line model = load_learner(model_path) to model = load_learner(model_path, cpu=True). The reason we need to do this is because we are using the free tier we only have CPU access no GPU. Save the file.
On the main repo page click the add files button and select the upload files option:

On the following page you can either click and drag into, or click the upload files section to load the files. The files that are necessary are requirements.txt file, the app.py file, and the models folder, select them and load them up.

You get the option to remove files if you would like, I will go ahead and remove all of the models except the v2 classifier, since that is the final version. Delete them if you’d like and click the “Commit changes to main” button at the bottom of the screen. The project should begin building and will let you know when it’s done. After it finishes click the “App” button that is beside the “Files” button on the top right of the screen, and lets see what we have.
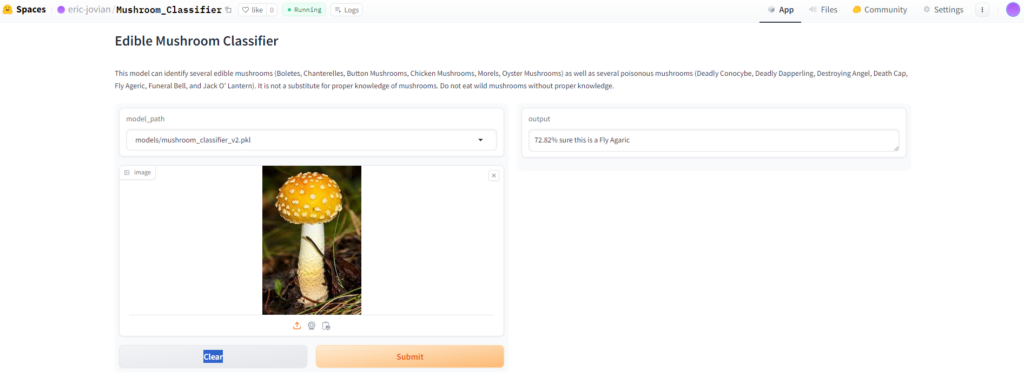
Looks to be firing on all cylinders!
Conclusion
I hope you al enjoyed this series and that it served to show how approachable deep learning actually is. We were able to see importance of data quality and variety, the effectiveness of iterative model training, and the power of tools like Gradio and Hugging Face Spaces in making AI projects accessible and interactive. Thanks for giving this a read, and keep an eye out on the blog for more interesting posts!